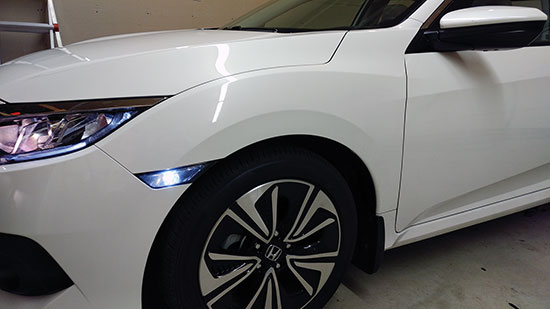
Swapping the side markers on a 2016+ Honda Civic

Overall, I’ve been quite happy with my 2017 Honda Civic EX-T. However, there are some cosmetic changes that I personally think make a world of difference. One of them is debadging it (or removing the “Civic” emblem from the back). Another area for improvement is to swap out the side markers, which by default (and according to law in most of the United States), is amber in colour. As it is the only area on the car that is that gross yellow/orange colour, I thought that it could be vastly improved by swapping it to either clear or some smoked black look. Initially, I ordered the ASEAN market OEM Honda clear side markers on eBay. However, I decided that on my White Orchid Pearl Civic, “smoked black” may look better, so I ordered them instead. Here’s a before-and-after of it:

2017 Honda Civic side marker changed to smoked or clear

Following the great instructions provided by a CivicX forum member, I got started. Though his instructions are spot-on, the procedure for swapping to the non-OEM smoked markers was actually a little easier. Basically, step 4 (cutting the tabs on the socket) was unnecessary. So, a simplified and concise list of the steps required for my particular swap is:

  • Turn the wheels inward to give you more room to access the wheel liner
  • Remove the three screws holding the wheel liner
  • Press on the side marker clip that holds it to the body, whilst simultaneously pushing the marker itself outward away from the body
  • Use a very small flat head screwdriver to depress the tab holding the bulb socket to the harness
  • Swap in a new bulb (if you have one, and I can recommend the Philips 194/T10 white LED bulbs, but realise that since they are white, they will not be “street legal” in many municipalities)
  • Test the polarity once you have inserted the bulb by simply turning on your headlights
  • Place the harness/new bulb/socket into the new side marker (noting that one notch is larger than the rest, which may require rotation of the side marker)
  • Align the new side marker accordingly, and make sure that it snaps into place

The only caveat I found is that the marker on the passenger’s side did not seem to want to snap into place as easily as did the one on the driver’s side. It took a little wiggling, and ultimately required me to press more firmly on the marker itself in order to get it to stay put.

For a process that only took approximately 30 minutes, though, I think that the swap made a world of difference to the overall appearance of the car. I also am happy with my choice to use the white LED bulb, as it shows quite nicely through the smoked lens:

2017 Honda Civic side marker changed to smoked or clear with white LED bulb

Cheers,
Zach

USB UAC2 DAC in Linux (the Emotiva Big Ego with Gentoo Linux)

Recently I was on a mission to make my audio experience on my main desktop more enjoyable. I had previously just used some older Bose AE2 headphones from 2010 plugged in directly to the 3.5mm audio output on the back of my desktop. The sound quality was mediocre at best, and I knew that a combination of a Digital-to-Analogue Converter (DAC) and some better headphones would certainly improve the experience. I also knew that the DAC would probably yield the most noticeable improvements, so I purchased the Big Ego USB DAC from one of my favourite audiophile-grade manufacturers, Emotiva. I have several of their monoblock amplifiers and use their amazing XMC1 for my preamp/processor in my home audio system, so I knew that the quality would be outstanding, especially for the price.

Emotiva Big Ego DAC and V-Moda Crossfade M-100 headphones

Now, the Big Ego FAQ on the Emotiva website indicates that it should work with all modern computing devices:

Q: What devices can I use the Ego DACs with?
A: The Ego DACs are basically designed to work with any modern โ€œcomputer deviceโ€ which can be used
with an external USB sound card, which includes:
1) All modern Apple computers
2) All modern Windows computers (Windows XP, Vista, 7, 8.0, 8.1, and Windows 10)
3) Many Linux computers (as long as they support USB Audio Class 1 or 2)
4) Some Android tablets and phones (as long as they support UAC1 or UAC2)
5) Apple iPhone 5 and iPhone 6 (with the lightning to USB camera adapter)

For many Linux users, the Big Ego probably works without any manual intervention. However, if it doesn’t, it shouldn’t be that difficult to get it working properly, and I hope that this guide helps if you are running into trouble.

Firstly, let’s get something out of the way, and that’s USB Audio Class 2 (UAC2) support within Linux. With all modern distributions (>=2.6 kernel), UAC2 is readily available. It can be validated by looking at the audio-v2.h file within the kernel source:

# grep 'From the USB Audio' /usr/src/linux/include/linux/usb/audio-v2.h
* From the USB Audio spec v2.0:

Feel free to look at the full file to see the references to the UAC2 specification.

Kernel support:

Secondly, and also speaking to the kernel, if your distribution doesn’t even show the device, you are likely lacking the one needed kernel driver. To see if your system recognises the Emotiva Big Ego, try the following command and look for similar output:

$ lsusb -v | grep 'Emotiva Big Ego'
...
iProduct 3 Emotiva Big Ego
...

The full identifier (Vendor ID and Product ID) from lsusb is 20ee:0021, even though it doesn’t have a description:

# grep -A 4 /var/log/messages
kernel: usb 9-1: New USB device found, idVendor=20ee, idProduct=0021
kernel: usb 9-1: New USB device strings: Mfr=1, Product=3, SerialNumber=2
kernel: usb 9-1: Product: Emotiva Big Ego
kernel: usb 9-1: Manufacturer: Emotiva

$ lsusb | grep '20ee:0021'
Bus 009 Device 005: ID 20ee:0021

If you don’t get similar output, then you’re lacking kernel support for the Big Ego. The one driver in the kernel that you need is the “USB Audio/MIDI driver” which can be found in the make menuconfig hierarchy as:

Device Drivers --->
  <*> Sound card support --->
    <*> Advanced Linux Sound Architecture --->
      [*] USB sound devices --->
        <*> USB Audio/MIDI driver

You can also check your kernel .config for it, or if you have it as a module, load it:

$ grep -i snd_usb_audio /usr/src/linux/.config
CONFIG_SND_USB_AUDIO=y

OR

# modprobe snd-usb-audio

Emotiva Big Ego DAC and V-Moda Crossfade M-100 headphones

ALSA configurations:

Thirdly, and now that you have the appropriate kernel support, let’s move on to configuring and using the Big Ego with ALSA. You can see a list of device names by using aplay -l, and it’s best to address the device by name instead of number (because the numbering could possibly change upon reboot). This one-liner should show you precisely how it is named (note that your output may be different based on the available sound output devices on your system):

$ aplay -l | awk -F \: '/,/{print $2}' | awk '{print $1}' | uniq
Intel
NVidia
Ego

With that information, you are ready to set the Big Ego as your default sound output device by editing either .asoundrc (in your home directory, for a per-user directive) or within the system-wide /etc/asound.conf (which is the one that I would recommend for most situations). I tried various configurations for my ALSA configuration, but would end up with various oddities. For instance, I ran into a problem where I had sound in applications like Audacious, mpv, and even ALSA’s own speaker-test, but had no sound in other terminal applications like ogg123 or, more importantly, web browsers like Firefox and Chromium. The only configuration that worked fully for me was:

$ cat /etc/asound.conf
defaults.pcm.!card Ego
defaults.pcm.!device 0
defaults.ctl.!card Ego
defaults.ctl.!device 0

After changing your ALSA configuration, you need to reload it, and the method for doing so varies based on your distribution and init system. For me, using Gentoo Linux with OpenRC, I just issued, (as root), /etc/init.d/alsasound restart and it reloaded. Worst case, just reboot your system to test the changes.

Now that you have it set as the default card, applications like alsamixer and such should automatically choose the Big Ego for your levels and mixing. One thing that I noticed with alsamixer is that there are two adjustable level sliders:

alsamixer with the Emotiva Big Ego USB DAC

What I am guessing is that, even though they are labelled “Emotiva Big Ego” and “Emotiva Big Ego 1”, they actually correspond to the output that you are using on the DAC. For instance, I am using the 3.5mm headphone jack on the front, and that corresponds to the “Emotiva Big Ego 1” slider, whereas if I were using the line out jack on the back of the DAC (those rhymes are fun ๐Ÿ˜› ), I would adjust it using the slider for “Emotiva Big Ego”.

Additional configurations:

Now that we have configured ALSA to use our USB DAC as the default sound card, there are some additional things that I would like for my convenience. I prefer to not use a full desktop environment (DE), but instead favour a more minimalistic approach. I just use the Openbox window manager (WM). One of the things that I like about Openbox is the ability to set my own key bindings. In this case, I would like to be able to control the volume by using the designated keys on my keyboard, regardless of the application that is using the USB DAC. Here are my key bindings, which are added to ~/.config/openbox/rc.xml:


    <!-- Keybinding for increasing Emotiva Big Ego volume by 1 -->
    <keybind key="XF86AudioRaiseVolume">
      <action name="execute">
        <command>amixer set 'Emotiva Big Ego',1 1+</command>
      </action>
    </keybind>
    <!-- Keybinding for decreasing Emotiva Big Ego volume by 1 -->
    <keybind key="XF86AudioLowerVolume">
      <action name="execute">
        <command>amixer set 'Emotiva Big Ego',1 1-</command>
      </action>
    </keybind>
    <!-- Keybinding for muting/unmuting volume -->
    <keybind key="XF86AudioMute">
      <action name="execute">
        <command>amixer set 'Emotiva Big Ego',1 toggle</command>
      </action>
    </keybind>

Take note that the subdevice is ‘1’ (bold in the code above). That is because, like I showed in the alsamixer output, I’m using the headphone jack (so it corresponds to the secondary volume slider).

Further troubleshooting:

I hope that these instructions help you get your USB DAC working under Linux, but if they don’t, feel free to leave me a comment here. We’ll see what we can do to get it working for you. One last note is that I experienced some rather severe popping and other undesirable sounds when I had the Big Ego plugged into one of the USB2 ports on the back of my tower. Swapping it to its own non-shared USB3 port fixed that problem. So, if you have it plugged into a USB hub or something similar, try isolating it. Remember, it is a sensitive piece of audio equipment, and special considerations may need to be made. ๐Ÿ™‚

Cheers,
Zach

Debadging – Removing the model emblem from my 2017 Honda Civic

Last week I received an unexpected but great email that my new car had arrived way ahead of schedule. I had ordered a 2017 Honda Civic EX-T back in November, but it wasn’t slated to come in until February 2017. I had to order one from the factory because I wanted to get one that perfectly matched my needs and wants, and apparently, that’s rare. When the 2016 came out, I was uninspired because I wanted the 1.5L turbocharged engine instead of the 2.0L naturally aspirated one, and I also wanted some of the bells and whistles (like the larger display, more speakers, et cetera), but above all else, I wanted a manual transmission. For 2017, Honda came through in that I could get the manual transmission a trim higher than the base model. The EX-T had everything I wanted, and I picked it up on Friday, 30 December 2016.

As with all of my previous vehicles, there are things that I want to change about this car, but far fewer than ever before. I’m quite happy with the performance, the smooth ride, and the niceties that come with the higher trim level. Not even a week later, though, and I took on my first modification to the car (albeit a minor one). Though it wasn’t something as involved as swapping a JDM K20a / Y2M3 (from the ITR), it did make a noticeable difference with the car (just a cosmetic one this time). ๐Ÿ™‚

Though I love the looks of the 2017 Civic, I think that the “Civic” emblem/badge makes the car look asymmetrical and a little less classy. So, I thought it best to remove it completely.

2017 Honda Civic emblem removed - debadged letters

The process was relatively straightforward, but I understand that it can be a little unnerving to remove a badge on a brand new car. What happens if I scratch the paint? What if the adhesive is really strong and leaves a full residue? Those are legitimate concerns, but this little project turned out to be pretty easy. Here’s what I did:

  • Used a hair dryer to heat the adhesive behind each letter for ~60-90 seconds
  • Used a piece of floss in a seesaw motion behind each letter until they came off
  • Used an old credit card to remove some of the excess adhesive
  • Applied Goo Gone Automative Spray Gel to the remaining residue
  • Held a rag under the letters to catch the excess Goo Gone that would otherwise drip
  • Used my handy-dandy AmazonBasic microfiber cloth to get rid of the remaining residue
  • Washed the spot with some soap and water
  • Dried the spot with another microfiber cloth
  • Basked in the glory of having a much cleaner look to the rear of the car ๐Ÿ™‚

I think that the results were well worth the minimal amount of time and effort:

2017 Honda Civic emblem removed - debadged before and after

2017 Honda Civic emblem removed - debadged before and after - wide
Click each image to enlarge

The only thing that I would note is that I did need to apply a good amount of pressure when getting rid of the excessive adhesive with the old credit card, and especially when using the microfiber cloth & Goo Gone to clean the remaining residue. I was a bit nervous to press that hard at first, but soon realised that it was necessary, and as long as I was careful, it wouldn’t damage the clearcoat or the paint. I thought that it would take about 10 minutes, and it ended up taking about 45 to do it in my OCD manner. That being said, it could have been a lot worse. My friend Mike always used to say that “to estimate the time needed for a project—especially one involving a car—take your initial guess, multiply it by 2, and go up one unit of measure.” In that case, I’m glad that it didn’t take 20 hours. ๐Ÿ˜›

Cheers,
Zach