Last Thursday (07 June 2012), I went to my first wine class. The class was entitled “From Vine to Wine: Wine 101,” and was held at Wine Authorities in Durham, NC. Though I have enjoyed wine for several years, I have just recently started researching various aspects thereof–different varietals, regions, and so on. There was a lot of information presented in this two-hour class, and I plan on sharing some of the key points over the next couple weeks.
In this first post, I’m going to share some information regarding a method for tasting (or sampling) a wine that will allow you to get the most of out the experience. The process can be broken down into three stages: looking, smelling, and tasting. Though they are separate processes, the culmination of the three will result in something greater than any of the three individually; they will combine to bring about your overall experience of the wine.
Looking:
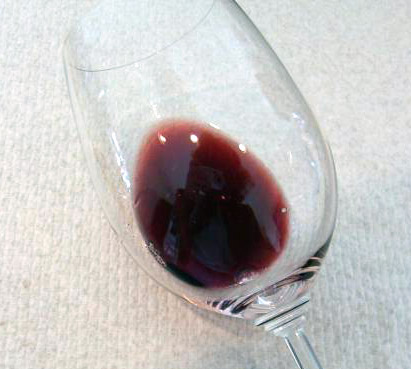
The first stage involves visually examining the wine in the glass. There are two parts to this process. The first is to simply tilt the glass to the side, which allows the wine to spread across a greater surface area within the glass. The main area of investigation is the colour of the wine. There will generally be a concentrated colour in the centre, with a more faded derivative toward the edges. The difference between those two colours can be minimal or stark. The colour of the wine will tell you a bit about its age, in that wines get darker with time. Therefore, if it is a darker hue, it is likely an older wine. The colour will also tell you a bit about the grape(s) used, and the corresponding varietal. For instance, pinot noirs tend to be more ruby-coloured, while cabernets show more purple tones. For whites, lighter ones tend to be brighter and more crisp (indicating a slightly higher acidity), while darker ones may have a more buttery, mellow taste.
The second part of the “looking” stage is to swirl the wine around in the glass. You want to make a circular pattern with the glass, and provided that it wasn’t overly full, it should swish around the sides of the glass without coming over the top. Not only does this process help aerate the wine, which is necessary for the “smelling stage,” but it also allows the wine to leave “legs” or “tears” down the side of the glass:
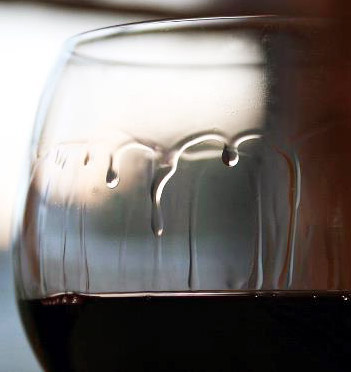
These legs essentially tell you two important things about the wine:
- The alcohol content
- The sugar content
Thicker legs indicate a higher viscosity (resistance to flow), and thus, a higher alcohol and lower sugar content. This can also be seen in the number of legs or tears that appear. Again, the higher the number, the more alcohol.
Smelling:
As the sense of taste is highly reliant on the olfactory sensations (the sense of smell), it is very important to take in the aromas of the wine before tasting. To do so, swirl the wine just as you did during the “Looking” stage. This time, though, stick your nose well into the glass, and breath in deeply. Do this two or three times in order to pick up on the nuances of the aroma. If you stop being able to distinguish the scents, smell something entirely different (such as coffee beans, or [more readily available] the sleeve of your shirt).
Dr. Ann Noble came up with a categorisation system for the aromas (and corresponding flavours) that are generally present in wines, and has made it available in her Aroma Wheel. Some of the major aromas are floral, spicy, fruity, nutty, earthy, and woody.
Tasting:
Ah, the stage you’ve been waiting for, right? Now that you have visually examined the wine, and taken in all of its aromas, it is time to taste. There are two steps to fully tasting the wine, and both of them help you experience all of the flavour complexities of the wine. Firstly, you need to take a sip and vigorously swish the wine around your cheeks and to the back of your tongue. As your tongue has receptors that are more or less sensitive to certain tastes, you swish so that the wine comes in contact with as many of them as possible. Secondly, you need to swallow the wine and immediately breathe out of your nose. Doing so will allow you to truly taste the wine in its entirety. Breathing out through your nose heightens the back taste, which is commonly known as “the finish,” and is the part of the taste that is generally used to judge the overall quality of the wine.
These three stages and multiple steps may seem like a lot to do just to sample a wine, but after you have done so a few times, they come naturally. Further, and more importantly, they allow you to fully take in everything that a particular wine has to offer. It seems obvious, but if you don’t like the wine during the tasting, why would you ever want to drink a full glass of it?
Cheers,
Zach