Introduction
Searching the internet has been both increasingly cumbersome and frightening due to privacy concerns with many of the major search engine providers (such as Google or Bing). Thankfully there are some other good options like Startpage, Qwant, and Mojeek. Some of them use results provided by the major providers like Google, and some of them are more independent. However, another option exists, and that’s to use an application like SearXNG that acts as a meta-search engine, “aggregating the results of other search engines” without “storing information about its users”.
I started using SearXNG quite some time ago by choosing a public instance, but have recently gone a bit further and installed my own self-hosted version of it on one of my Gentoo Linux servers. In this article, I’m going to outline the process of installing, configuring, and running a self-hosted SearXNG instance along with some troubleshooting tips and “gotchas” to avoid. Though the details are specific to Gentoo Linux, the concepts should be readily applicable to other Linux distributions.
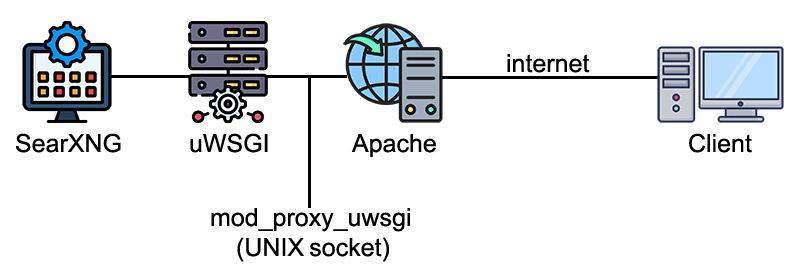
For my setup, I chose to install SearXNG in the uWSGI application server and proxy it via the Apache web server using the mod_proxy_uwsgi module. The flow of data follows the following design:
For the remainder of this article, I will use the pretend domain name of my-secret-search-engine.com. Any place where that domain is listed, replace it with your respective domain name or IP address of your server.
Installation – Prerequisites
To start, SearXNG should run as a system user, so that user should be created accordingly:
useradd -s /bin/bash --system -m --home-dir /usr/local/searxng searxngNow switch to that new user and create a Python virtual environment (venv) for installing and running the application and all of its dependencies. The Python venv is isolated from the overall system installation of Python so that there aren’t any conflicts with the system’s Python interpreter or module versions.
su - searxng
python -m venv /usr/local/searxng/searxng-pyvenv
The Python virtual environment needs to be activated in order to use it. It’s helpful to automatically activate it when switching to the ‘searxng’ user, which can be done by putting it in that user’s .bashrc:
echo "source /usr/local/searxng/searxng-pyvenv/bin/activate" >> /usr/local/searxng/.bashrcTo make sure that the automatic activation is working as intended, switch back to the root account and then back to the ‘searxng’ user:
exit
su - searxng
If the venv is activated, the name of the venv should be displayed before the standard BASH prompt:
# su - searxng
Last login: Thu Oct 24 14:52:00 UTC 2025 on pts/1
(searxng-pyvenv) searxng@my-secret-search ~ $
SearXNG has some prerequisite Python modules that need to be installed, so install them using Python’s own package manager, Pip:
pip install --upgrade pip setuptools wheel pyyaml msgspec typing_extensions pybind11To see the modules and versions that are currently installed in the virtual environment, the freeze subcommand can be issued in Pip:
$ pip freeze
PyYAML==6.0.3
setuptools==80.9.0
wheel==0.45.1
msgspec==0.19.0
Installation – SearXNG application
SearXNG doesn’t currently offer packaged “releases”, so the way to install it is to clone their Git repository and build the application from that clone:
mkdir -p /usr/local/searxng/searxng-pyvenv/source/
git clone "https://github.com/searxng/searxng" "/usr/local/searxng/searxng-pyvenv/source"
cd /usr/local/searxng/searxng-pyvenv/source/
pip install --use-pep517 --no-build-isolation -e .
After the installation finishes, there will be many more modules listed in Pip (the exact modules and versions may change with subsequent SearXNG versions):
$ pip freeze
anyio==4.11.0
async-timeout==5.0.1
babel==2.17.0
blinker==1.9.0
Brotli==1.1.0
certifi==2025.10.5
click==8.3.0
fasttext-predict==0.9.2.4
Flask==3.1.2
flask-babel==4.0.0
h11==0.16.0
h2==4.3.0
hpack==4.1.0
httpcore==1.0.9
httpx==0.28.1
httpx-socks==0.10.0
hyperframe==6.1.0
idna==3.11
isodate==0.7.2
itsdangerous==2.2.0
Jinja2==3.1.6
lxml==6.0.2
markdown-it-py==3.0.0
MarkupSafe==3.0.3
mdurl==0.1.2
msgspec==0.19.0
Pygments==2.19.2
python-dateutil==2.9.0.post0
python-socks==2.7.2
pytz==2025.2
PyYAML==6.0.3
setproctitle==1.3.7
setuptools==80.9.0
six==1.17.0
sniffio==1.3.1
typer-slim==0.19.2
typing_extensions==4.14.1
valkey==6.1.1
Werkzeug==3.1.3
wheel==0.45.1
whitenoise==6.11.0
Installation – uWSGI application server
Now that the SearXNG application itself has been installed, it’s time to install the application server (before proceeding to configure both the application server and SearXNG itself). I chose to go with uWSGI. Since uWSGI supports many different application languages and various plugins, and seeing as they can be easily configured with Gentoo’s USE flags, they should be set before installing uWSGI:
# grep uwsgi /etc/portage/package.use
www-servers/uwsgi -embedded -php python UWSGI_PLUGINS: -carbon -http -mongodblog -nagios -redislog -rrdtool pam

# emerge -av uwsgi
With the uWSGI server installed, it can be started automatically at boot time using Gentoo’s OpenRC init scripts:
cd /etc/conf.d
cp -v uwsgi uwsgi.searxng
ln -s /etc/init.d/uwsgi{,.searxng}
rc-update add uwsgi.searxng default
The above commands make a copy of the uWSGI configuration file specifically for SearXNG, and then create a new symlink of the uWSGI init script as /etc/init.d/uwsgi.searxng. Lastly, that new uwsgi.searxng init script is started at the default runlevel during the boot process.
Configuration – uWSGI application server
With both the SearXNG application and the uWSGI application server installed, it’s time to configure both of them accordingly. We’ll start with the uWSGI application server as it is more straightforward. First, we will copy the uWSGI template provided by SearXNG to the overall system location:
cp -v /usr/local/searxng/searxng-pyvenv/source/utils/templates/etc/uwsgi/apps-available/searxng.ini /etc/searxng/searxng.iniSecond, we will edit the uWSGI startup configuration to call this file:
echo 'UWSGI_EXTRA_OPTIONS="--ini /etc/searxng/searxng.ini"' >> /etc/conf.d/uwsgi.searxngThe full configuration file (excluding comments and blank lines) should look similar to the output below. The only other change that I made was to add a path for the log file. As such, the lines that I changed are in purple italics here, but feel free to make other changes for your particular setup or needs:
# grep -v "^#\|^$" /etc/conf.d/uwsgi.searxng
UWSGI_SOCKET=
UWSGI_THREADS=0
UWSGI_PROGRAM=
UWSGI_XML_CONFIG=
UWSGI_PROCESSES=1
UWSGI_LOG_FILE=/var/log/uwsgi.log
UWSGI_CHROOT=
UWSGI_DIR=
UWSGI_PIDPATH_MODE=0750
UWSGI_USER=
UWSGI_GROUP=
UWSGI_EMPEROR_PATH=
UWSGI_EMPEROR_PIDPATH_MODE=0770
UWSGI_EMPEROR_GROUP=
UWSGI_EXTRA_OPTIONS="--ini /etc/searxng/searxng.ini"
Configuration – SearXNG application
With uWSGI being configured, it’s time to configure the SearXNG application itself. The configurations for it are handled by two separate files:
- /etc/searxng/searxng.ini –> settings for running SearXNG as an application in uWSGI
- /etc/searxng/settings.yml –> configuration options for the application itself
First, make the directory for storing these two settings files and copy them from the SearXNG sources:
mkdir -p /etc/searxng/
cp -v /usr/local/searxng/searxng-pyvenv/source/utils/templates/etc/uwsgi/apps-available/searxng.ini /etc/searxng/
cp -v /usr/local/searxng/searxng-pyvenv/source/utils/templates/etc/searxng/settings.yml /etc/searxng//usr/local/searxng/searxng-pyvenv/source/utils/templates/etc/searxng/settings.yml
OR
/usr/local/searxng/searxng-pyvenv/source/searx/settings.yml
The first one (and the one used here) is much more compact and basically sets the defaults for most things, allowing for overrides where desired. I would strongly suggest using this first template unless you have a very specific reason to use the full one.
Starting with /etc/searxng/searxng.ini (which again is for configuring how the application will run inside the uWSGI server), here are the settings I suggest (pay close attention to the settings in purple italics as they are pertinent):
# grep -v "^#\|^$" /etc/searxng/searxng.ini
[uwsgi]
uid = searxng
gid = searxng
env = LANG=C.UTF-8
env = LANGUAGE=C.UTF-8
env = LC_ALL=C.UTF-8
chdir = /usr/local/searxng/searxng-pyvenv/source/searx/
env = SEARXNG_SETTINGS_PATH=/etc/searxng/settings.yml
disable-logging = true
chmod-socket = 666
single-interpreter = true
master = true
lazy-apps = true
plugin = python313,asyncio313
enable-threads = true
workers = ${UWSGI_WORKERS:-%k}
threads = ${UWSGI_THREADS:-4}
module = searx.webapp
virtualenv = /usr/local/searxng/searxng-pyvenv
pythonpath = /usr/local/searxng/searxng-pyvenv/source/searxng
socket = /usr/local/searxng/run/socket
buffer-size = 8192
offload-threads = %k
Now for the SearXNG settings themselves (in /etc/searxng/settings.yml), the template yields the following options by default:
# grep -v "^#\|^  #\|^$" /usr/local/searxng/searxng-pyvenv/source/utils/templates/etc/searxng/settings.yml
use_default_settings: true
general:
  debug: false
  instance_name: "SearXNG"
search:
  safe_search: 2
  autocomplete: 'duckduckgo'
  formats:
    - html
server:
  secret_key: "ultrasecretkey"
  limiter: true
  image_proxy: true
valkey:
  url: valkey://localhost:6379/0
The only option that MUST be changed is the ‘secret_key’, and it can be done easily with:
sed -i -e "s/ultrasecretkey/$(openssl rand -hex 16)/g" /etc/searxng/settings.ymlThere are many other options that can be set or unset, and they are fairly well documented. Here’s an example settings.yml file with some of the settings that I personally prefer, followed by a brief explanation of them:
# grep -v "^#\|^  #\|^$" /etc/searxng/settings.yml
use_default_settings: true
general:
  debug: false
  instance_name: "My Secret Search Engine"
  enable_metrics: false
search:
  safe_search: 0
  autocomplete: ""
  formats:
    - html
server:
  secret_key: "YOUR_RANDOM_KEY"
  limiter: false
  image_proxy: true
  http_protocol_version: "1.1"
  method: "GET"
ui:
  theme_args:
    simple_style: black
url_formatting: full| Option | Explanation |
|---|---|
| instance_name: | Setting it to your site's name will display it in the browser's title bar |
| enable_metrics: false | Various anonymous metrics; disabled for even better anonymity |
| safe_search: 0 | Disables all "safe search" filtering |
| autocomplete: "" | Which autocomplete backend to use; in this case none |
| image_proxy: true | Uses your instance to proxy images for better anonymity |
| method: "GET" | Favours some ease of use over the more private "POST" |
| url_formatting: full | Shows the full URL of all links instead of a breadcrumb ("pretty") |
Configuration – Apache web server
Now that both the uWSGI application server and the SearXNG application itself have been installed and configured, the last step is to proxy through the Apache web server.
Doing so requires two Apache modules: mod_proxy and mod_proxy_uwsgi. Linux distributions have different methods of enabling Apache modules, so consult your distribution’s documentation on doing so. In Gentoo, it is done by adding “proxy” and “proxy_uwsgi” to APACHE2_MODULES and re-emerging it.
It’s also important to load mod_proxy BEFORE mod_proxy_uwsgi, so make sure that the order is correct in the module-loading section of /etc/apache2/httpd.conf:
# grep proxy /etc/apache2/httpd.conf
LoadModule proxy_module modules/mod_proxy.so
LoadModule proxy_uwsgi_module modules/mod_proxy_uwsgi.so
As for the Apache vhost configuration, it is likely quite similar to any other site you have configured (and generic vhost configuration is outside the scope of this article). The parts that are specific to SearXNG are the proxy directives. Assuming that SearXNG is going to be accessed at the root of the domain, the proxy directives should look like:
## Removed these main directives from <Location> block for Certbot.
## This allows bypassing the proxy for the .well-known/ subdirectory for LetsEncrypt
        ProxyPreserveHost On
        ProxyPass /.well-known/ !
        ProxyPass / unix:/usr/local/searxng/run/socket|uwsgi://localhost/

        RequestHeader set X-Forwarded-Proto %{REQUEST_SCHEME}s
        RequestHeader set X-Script-Name /searxng
        RequestHeader set X-Real-IP %{REMOTE_ADDR}s
        RequestHeader append X-Forward-For %{REMOTE_ADDR}s
The ‘ProxyPass’ line in purple is the one that is responsible for proxying the HTTP request via UNIX socket to the uWSGI application server and vice-versa. After reloading Apache, your SearXNG instance should now be accessible. If it isn’t, you may find some additional pointers in the “Troubleshooting and Gotchas” section at the bottom of this article.
In the Apache vhost configuration above, I removed the whole block from the <Location> tags so that I could add in a bypass for the proxy (the line in orange). This allows for Certbot to renew the SSL certificate since that particular subdirectory is excluded from the proxied uWSGI application.
Updating the SearXNG application
As previously mentioned, SearXNG doesn’t publish releases so updating involves pulling down the latest Git master branch, updating dependencies, and then rebuilding. There are many different methods for performing these updates in Git, but my approach is:
su - searxng
cd /usr/local/searxng/searxng-pyvenv/source
git pull origin master
pip install --upgrade pip setuptools wheel pyyaml msgspec typing_extensions pybind11
pip install --upgrade --use-pep517 --no-build-isolation -e .
exit
/etc/init.d/uwsgi.searxng restart
The steps outlined in the code block above will:
- Switch to the ‘searxng’ user, which will activate the Python virtual environment (assuming you followed the instructions in the ‘Installation – Prerequisites’ section of this article)
- Change to the SearXNG source directory (Git)
- Pull the latest files from SearXNG’s Git master branch
- Use pip to update the dependencies
- Use pip to rebuild the application using the latest sources
- Switch back from the ‘searxng’ user back to root (“exit”)
- Restart the uWSGI application server containing the SearXNG application
After these steps, SearXNG should be the latest version. This can be validated by checking the following line in the footer of the page. For example:
Powered by SearXNG – 2025.10.24+2cdbbb249
That line should show the date of the pull and the first 9 characters of the latest commit that was pulled.
Updating – Rolling back
In case a particular update causes a problem, it can be readily rolled back to the previous version you had installed by performing a git reset:
su - searxng
cd /usr/local/searxng/searxng-pyvenv/source
git reset --keep HEAD@{1}
pip install --upgrade --use-pep517 --no-build-isolation -e .
exit
/etc/init.d/uwsgi.searxng restart
Troubleshooting and Gotchas
If you run into problems with the installation or configuration steps throughout this article, some of the more common errors and pitfalls are listed here, separated into sections based on where the problem lies.
SearXNG application
The SearXNG settings are documented quite well, but I did run into a particular syntax discrepancy that caused unexpected results. When using the use_default_settings directive, there is a syntax difference based on whether or not any of the search engines will be modified.
If no engine modifications will be made:
WORKS:
use_default_settings: trueFAILS:
use_default_settings:If, however, any engine modifications are present, the true value must be dropped.
WORKS:
use_default_settings:
  engines:
    remove:
      - google
FAILS:
use_default_settings: true
  engines:
    remove:
      - google
In the ‘fails’ scenarios, the uWSGI log will show errors related to various Python scripts with these lines being at or near the end of the trace:
File "/usr/local/searxng/searxng-pyvenv/source/searx/settings_loader.py", line 218, in load_settings
user_cfg = load_yaml(cfg_file)
File "/usr/local/searxng/searxng-pyvenv/source/searx/settings_loader.py", line 48, in load_yaml
raise SearxSettingsException(e, str(file_name)) from e
searx.exceptions.SearxSettingsException: mapping values are not allowed here
in "/etc/searxng/settings.yml", line 5, column 10
unable to load app 0 (mountpoint='') (callable not found or import error)
*** no app loaded. going in full dynamic mode ***
uWSGI application server
If the following error message appears in the uWSGI log:
bind(): No such file or directory [core/socket.c line 230]
it is likely that the path to the UNIX socket is not present or that the permissions are incorrect. Check the ‘socket =’ line in /etc/searxng/searxng.ini and make sure the path is there and that the permissions are 755 owned by the ‘searxng’ user:
# ls -lhd /usr/local/searxng/run/
drwxr-xr-x 2 searxng searxng 4.0K Oct 24 17:38 /usr/local/searxng/run/
Apache web server
Though the Apache vhost configuration for SearXNG is essentially just the proxy section listed above, there are many syntax errors that can arise from it. The ProxyPass line—which passes HTTP requests to the UNIX socket—can be particularly finicky about syntax:
ProxyPass unix:/usr/local/searxng/run/socket|uwsgi://localhost/I found that only specifying the ‘uwsgi://’ protocol resulted in the application failing. In my case, I needed it to specifically reference ‘localhost’. As such, the following ProxyPass directive did not work for me:
ProxyPass unix:/usr/local/searxng/run/socket|uwsgi://